Case Study: Diagnosis and Temporary Mitigation of a Dormer Window Leak
Background
A homeowner contacted us following reports of water ingress into their property after periods of heavy rainfall. The leak was specifically affecting the area beneath a dormer window on the upper floor. Initial observations by the homeowner indicated water stains on internal ceilings and walls, suggesting a failure in the dormer’s weathering details.
Challenges
The building design presented significant access difficulties:
• There was no crawl space or loft access directly beneath the dormer, preventing a non-invasive internal inspection of the roof structure and underlay in this area.
• Initial external visual checks and drone survey revealed no obvious defects such as slipped or missing tiles, cracked flashings, or significant moss growth.
Inspection Process
1. Internal Inspection
Due to the absence of access beneath the dormer, an internal inspection was limited to observing the visible signs of water damage on ceilings and walls. No direct view of the roof timbers or membrane was possible.
2. Drone External Survey
A drone inspection of the dormer and surrounding roof slopes was carried out to identify any apparent external defects. No clear points of failure were visible from the air — tiles appeared intact, and no obvious damage to flashings or leadwork could be detected.
3. Invasive Inspection via Tower Scaffold
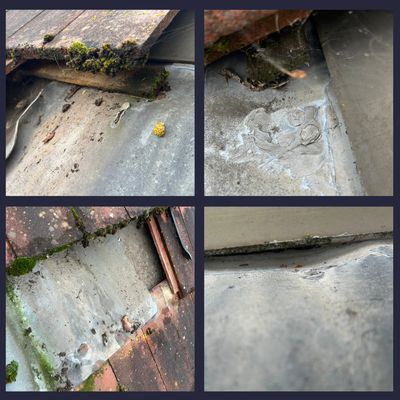
To accurately diagnose the issue, a tower scaffold was erected, providing safe working access to the dormer. The team carefully stripped back the tiles and underlay in the affected area. This invasive inspection revealed the true cause of the leak:
• The lead flashing on the dormer cheeks and apron had insufficient headlap (overlap at the top), allowing rainwater to run back under the lead and penetrate the structure below.
• The leadwork was not properly dressed or folded at both the upper and side ends, meaning that under certain wind-driven rain conditions, water could be forced directly into the building rather than being directed away.
Findings
The root cause of the persistent dormer leak was poor installation and detailing of the lead flashing, a common issue in older or poorly maintained dormer constructions. Insufficient headlap and lack of end folds created multiple pathways for water ingress, particularly during heavy or wind-driven rainfall.
Actions Taken
Due to the extent of the required works — including removal and replacement of lead flashing, re-dressing, new soakers where necessary, and re-tiling — the full repair could not be completed during the initial visit.
Instead, the team:
• Carried out temporary remedial measures to significantly reduce further water ingress (including re-sealing vulnerable points and redirecting water flow where possible).
• Prepared and issued a comprehensive detailed report, including:
• Annotated photographs from the invasive inspection
• Clear explanation of the defects and how they were allowing water penetration
• Recommendations for full remedial works
• Material specifications and estimated costs
The report was provided to both the homeowner and their insurance company to support any subsequent claim or repair approval process.
Outcome
This case illustrates the importance of progressing from non-invasive methods (internal inspection and drone survey) to invasive inspection when initial surveys do not reveal the cause of a leak. The lack of access beneath the dormer and absence of obvious external defects made it necessary to use tower scaffolding and undertake a targeted strip-back to reach a definitive diagnosis.
The temporary measures successfully limited further damage while the homeowner and insurer reviewed the full repair proposal. The detailed, evidence-based report provided all parties with the clarity needed to proceed confidently with permanent repairs.
This case highlights how persistent leaks in complex roof features such as dormers often require a combination of modern survey techniques and traditional hands-on investigation to identify hidden or subtle installation failures.
Case Study: Resolving a Persistent Office Leak at First Point Insurance Head Office
Background
First Point Insurance contacted us after staff reported persistent water ingress into one of their ground-floor offices. Water was visibly dripping from the ceiling during periods of heavy rain, creating disruption to daily operations and raising concerns about potential damage to office equipment, documents, and the building structure.
Initial Internal Inspection
Upon arrival, we carried out a detailed internal survey of the affected office. Ceiling tiles were carefully removed to expose the roof structure above. Inspection revealed:
• Wet and saturated structural timbers
• Active dripping from the timbers, particularly where water was running along a metal bracing strap before falling onto the ceiling tiles below
This confirmed that the source of the leak was above the office ceiling and that moisture had been penetrating the roof fabric for some time.
External Drone Survey
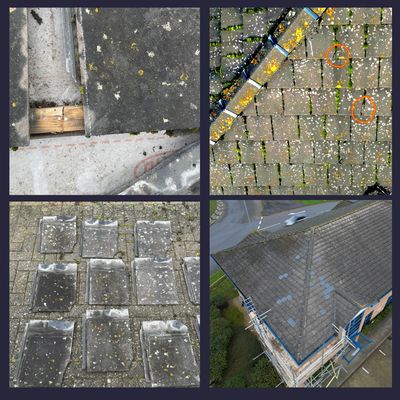
To safely and efficiently identify the external cause without unnecessary risk or disruption, a drone inspection of the roof was conducted. The aerial survey highlighted two key issues:
• Numerous roof tiles with chipped corners and damaged edges
• Excessive moss growth across significant areas of the roof
Both conditions are well-known contributors to water ingress: chipped tiles create direct pathways for rainwater to enter the roof structure, while thick moss retains moisture, prevents proper drainage, and accelerates tile deterioration.
Findings and Report
The combined internal and external inspections clearly established that rainwater was entering through a specific chipped tile, saturating the roof underlay and timbers, and eventually migrating downward through the structure until it reached the office ceiling.
A comprehensive report was prepared and issued to First Point Insurance, including:
• Annotated drone photographs showing the damaged tiles and moss coverage
• Internal photographs documenting the wet timbers and dripping points
• A clear explanation of the failure mechanism
• A detailed quotation for the recommended remedial works
Remedial Works
Following approval of the quotation, full scaffolding was erected to provide safe access to the affected roof area.
During the repair phase:
• Multiple damaged and chipped tiles were replaced with matching replacements
• The precise entry point — a single chipped tile that had allowed direct water penetration — was identified and rectified
• Excess moss was removed from the surrounding area
• The roof was left in a watertight condition, with improved drainage and reduced risk of future ingress
Outcome
The targeted repair successfully stopped the leak. Post-repair monitoring during subsequent heavy rainfall confirmed that the office remained dry, with no further water ingress or dripping.
The combination of a thorough internal inspection, non-invasive drone technology for external diagnosis, and precise remedial works enabled First Point Insurance to resolve the issue quickly, cost-effectively, and with minimal disruption to their head office operations.
This case demonstrates the value of using modern survey methods alongside traditional inspection techniques to accurately diagnose and permanently resolve commercial roof leaks.
Case Study: Resolving a Master Bedroom Ceiling Leak Caused by Chimney Defects
Background
A homeowner contacted us after discovering a significant water leak stain on the ceiling of their master bedroom. The affected area was located on the rear side of the property, indicating potential ongoing water ingress that could lead to further structural damage, mould growth, or expensive interior repairs if not addressed promptly.
Initial Site Inspection
On arrival, we examined the visible interior damage — a prominent brown water stain spreading across the bedroom ceiling, a typical sign of roof or chimney-related leakage.
Drone Survey of the Chimney
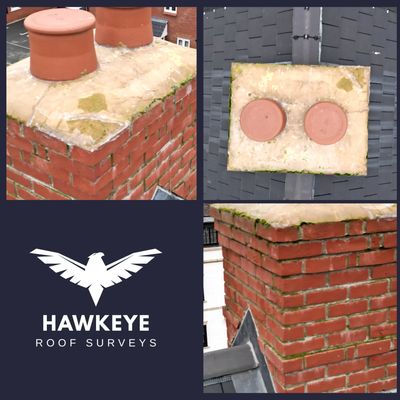
To safely assess the external condition of the chimney, we used a drone for a detailed aerial inspection. The survey identified multiple critical defects on the rear-facing side of the chimney stack:
• Multiple cracks in the flaunching (the mortar bedding that seals the top of the chimney stack around the pots)
• A significant build-up of moss growth, noticeably heavier than on neighbouring properties, suggesting prolonged moisture retention and poor maintenance
These issues are common causes of water penetration in fake chimneys, allowing rainwater to seep directly into the structure.
Internal Loft Inspection
We then accessed the loft space to inspect the underside of the chimney breast. A major finding was that the roofing membrane — intended to prevent moisture ingress from either external damage or internal condensation within the redundant chimney — had been installed the wrong way round. This incorrect installation allowed water to pass through the membrane rather than being directed away, resulting in moisture accumulation in the loft and eventual leakage through the ceiling below.
Findings and Recommendations
The survey concluded that the leak was caused by a combination of external weathering (cracked flaunching and heavy moss growth) and an installation error (reversed roofing membrane). These defects had permitted rainwater to penetrate the chimney structure, travel through the loft, and emerge as visible damage in the master bedroom.
A detailed report was prepared for the homeowner, including:
• Clear explanations of how each defect contributed to the leak
• Prioritised repair recommendations, including:
• Removal of moss and repair/replacement of the cracked flaunching
• Correct re-installation or replacement of the roofing membrane
• Additional waterproofing measures where required
• Ongoing maintenance advice to prevent future issues
Outcome
By combining a thorough visual interior assessment, drone technology for safe external inspection, and detailed internal verification, we accurately diagnosed a multi-factor leak that could have been misattributed with a less comprehensive survey. The homeowner received a transparent, evidence-based report with practical solutions, enabling them to proceed confidently with targeted repairs to restore the property and prevent future water damage.
This case demonstrates the value of using modern inspection techniques alongside traditional hands-on checks when diagnosing complex roof and chimney leaks.

Case Study: Diagnosis and Resolution of a Leaking GRP Dormer Roof
Background
A homeowner contacted us after discovering persistent water ingress in their top-floor bedroom. The affected area featured a GRP (Glass Reinforced Plastic/fibreglass) dormer structure, typical of many loft conversions. The leak had caused noticeable damage to the internal plasterboard ceiling.
The property was covered under an NHBC (National House Building Council) warranty. The insurer had previously carried out a report on the building, although this did not include a physical inspection of the roof. The homeowner supplied us with the detailed NHBC report, which clearly identified the location of the leak, allowing us to plan an efficient inspection.
Challenge
Key challenges included:
• Accurately identifying the source of the leak with minimal disruption to the homeowner
• Safely and cost-effectively accessing a high-level dormer roof
• Dealing with significant surface contamination (algae and moss) that obscured potential defects
• Producing a comprehensive, evidence-based report suitable for warranty claims and repair planning
Inspection Approach
On arrival at the property, we deployed our drone to carry out a non-invasive aerial inspection of the dormer roof. This approach enabled a thorough examination without the need for the homeowner to be present or for immediate scaffolding to be erected.
The initial inspection revealed that the dormer surface was heavily covered in moss, algae, and organic growth — a frequent condition that can trap moisture and accelerate deterioration of GRP surfaces.
Key Findings
Detailed examination of the ridge line of the dormer identified several critical defects:
• Visible cracks in the GRP material
• Indentations and surface irregularities capable of allowing water penetration
These defects permitted rainwater to enter the structure and travel downwards, eventually saturating the internal plasterboard and causing the observed ceiling damage.
Recommendations & Report
We prepared a detailed survey report that included:
• Annotated findings from the aerial inspection
• Analysis of the likely cause of damage (a combination of material fatigue, lack of regular maintenance, and moisture retention due to organic growth)
• Repair options, including targeted GRP patching and sealing, full overlay systems, or complete replacement
• Safe access recommendations (e.g. minimal scaffolding or MEWP access for repair works)
• Preventive measures to avoid future issues, such as regular cleaning and application of UV-protective coatings
Outcome
The drone inspection provided clear, objective evidence that supported the homeowner’s NHBC claim. The report enabled prompt and informed decisions regarding repairs, helping to limit further internal damage and disruption.
This case demonstrates the effectiveness of modern inspection technology in roofing diagnostics — offering safer, faster, and more accurate assessments, particularly for difficult-to-reach dormer structures. With proper maintenance, GRP dormers can provide long-term performance, but early identification of cracks and routine cleaning are essential to prevent expensive leaks and internal damage.